
 2
2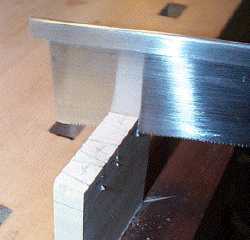
 4
4
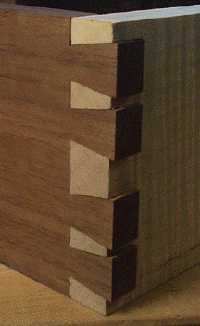
1: Carefull layout of the pins on well prepared stock(flat, square, and clean), is essential all good joinery, especially so with dovetailing. The pins are always laid-out and cut first. These are the drawer fronts all laid out and ready for cutting.
2: Using a good sharp dovetail saw, you cut as close to the line as your sawing skills will alow, being careful to not go over the scribe line.
3: After sawing, the waste wood is removed using a sharp chisel. One downward cut from a light blow with the mallet is followed by a paring cut to remove the chip.
4: Once all the waste is chopped out, the pins are pared to the marked lines. Great care is taken to ensure that they remain square.
 2
2
 4
4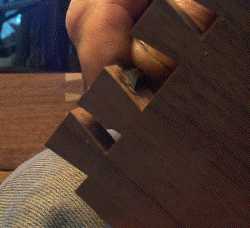
1: After the pins are completely pared to final size, square and clean, they are used to mark the tails. This is done by using them as a template and directly transferring the marks onto the tail stock (drawer side). A sharp "H" or "2H" pencil is a real help here. Holding the pin stock (drawer front) exactly in place for marking all four tails, is, obviously, essential.
2: Trust your pencil marks. Again, sawing as close as you dare to the line. The better your sawing is the less paring you have to do later; however, if you saw over the line...
3: Just as in the preparation of the pins, the steps are the same: mark, saw, chop,and pare. Note that in chopping both the pins and the tails, you only chop halfway through, then flip the wood and come in from the other side.
4: Paring the tails is done with even more care than on the pins; this is where your fit is accomplished. Trust your pencil marks. And as you near the lines, check carefully using the pins to see how much is left to remove.
 2
2
